When to Change Garage Door Remote Battery: A Practical Guide
Learn the signs your garage door remote battery needs replacement, how to choose the right battery, and a clear, step-by-step process to replace and re-sync safely.

You will determine when to change your garage door remote battery by checking indicator beeps, test distance, and response speed. Common signs include weak signal, intermittent opening, or failure to respond. Replace with a fresh, compatible battery (usually CR2032) and re-sync the remote according to your opener model. If the original symptoms persist after replacement, consult the manual or GarageDoorAdjust for model-specific steps.
Understanding when to change the remote battery
According to GarageDoorAdjust, the rechargeable life of a garage door remote is highly dependent on the underlying coin-cell battery and how often the remote is used. A practical homeowner approach is to treat the battery like an essential consumable component that can degrade with time and use. Start by noting when your remote loses range, responds slowly, or briefly operates before stalling. These symptoms are often a sign to inspect or replace the battery rather than chasing other, more complex issues with the opener.
Next, consider your remote’s model and the battery type it uses. Most common remotes rely on small CR-series batteries (commonly CR2032). However, some units may use other coin cells or even multiple cells. Always reference your manual or model number before purchasing a replacement. A quick check of the battery’s packaging or the inside of the battery compartment will usually reveal the required size. By keeping a spare battery sized to your model on hand, you can minimize downtime when a replacement becomes necessary.
Signs your remote battery is dying
Weak range and delayed response are the most noticeable symptoms that your remote battery needs replacement. If you notice you must press the button multiple times or stand closer to the opener before it responds, this is a strong indicator. You may also see the LED on the remote blink or dim when attempting to operate the opener. In some cases, the remote may fail to operate entirely, even though the opener itself is functioning normally. GarageDoorAdjust analysis shows battery issues are a common cause of remote failure, so start with the battery when diagnosing symptoms.
Battery options: compatibility and choosing the right one
The right battery depends on your remote’s design and the manufacturer’s specifications. The vast majority of remotes use a CR2032 coin cell, but other sizes such as CR2025 or CR2450 are also used. When replacing, never mix battery brands or sizes within a single remote, and never use a battery with swollen or damaged packaging. If your remote uses two cells, both must be identical in type and age to maintain even voltage. If you’re unsure, consult the owner's manual or reach out to customer support for the exact specification. In many cases, a high-quality, name-brand CR2032 will work across multiple models, but always verify compatibility before purchasing.
Testing after replacement and safety considerations
After inserting a new battery, test the remote by attempting to operate the garage door from several distances and angles. If the door responds reliably at typical distances but not at maximum range, you may still be dealing with battery performance as it declines with temperature and age. Observe the device for any unusual heat buildup or leakage; if you notice anything concerning, discontinue use and replace it with a fresh battery from a reputable supplier. Remember to dispose of old batteries properly according to local guidelines. Finally, ensure the remote’s case is securely closed to protect against dust and moisture.
Authority sources
For safety and best practices related to battery replacement and garage door operation, consult the following sources:
- https://www.cpsc.gov
- https://www.osha.gov
- https://www.energy.gov
These references provide general guidance on safe handling of batteries and household electronics, as well as manufacturer recommendations for garage door system safety.
Tools & Materials
- CR2032 coin-cell battery(Check model compatibility; some remotes use CR2025 or two cells)
- Small screwdriver (Phillips #0 or #1)(Use the appropriate size to avoid stripping screws)
- Plastic pry tool or old credit card(For gently popping the remote case apart if needed)
- Lint-free cloth or microfiber cloth(Wipe away any fingerprints around the battery compartment)
- Owner’s manual or model number within reach(Helpful if you’re unsure about battery type or re-sync steps)
- Safety gloves (optional)(Basic protection when dealing with small components)
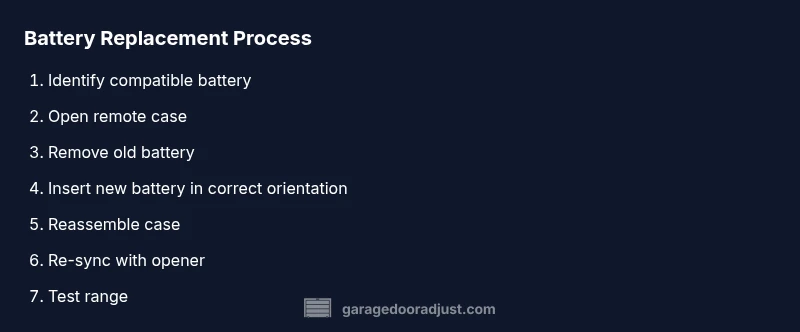
Steps
Estimated time: 15-25 minutes
- 1
Gather tools and verify battery type
Collect the replacement battery and the small screwdriver, and confirm the exact battery size required for your remote by checking the manual or the inside of the old battery. Why: using the wrong size prevents proper seating and may damage the device.
Tip: Keep spare batteries handy for future replacements. - 2
Open the remote case carefully
Use the small screwdriver to remove any screws and gently pry open the case with a plastic pry tool if needed. Why: a snug case protects the electronics from dust and moisture.
Tip: Work on a clean surface to avoid losing tiny components. - 3
Remove the old battery
Carefully lift the battery from its slot, noting the orientation of the positive (+) and negative (−) terminals. Why: incorrect orientation can damage the remote’s circuitry.
Tip: Take a quick photo of the battery orientation for reference. - 4
Check polarity and seating
Inspect the battery contacts for corrosion and ensure the new battery sits flat and fully seated. Why: poor contact leads to intermittent operation.
Tip: If contacts look oxidized, gently clean with a dry cloth. - 5
Install the new battery
Place the new CR2032 battery into the slot with the correct orientation and press down until it sits securely. Why: proper seating ensures a reliable connection.
Tip: Avoid touching the battery’s surface with fingers to minimize oils on the contacts. - 6
Reassemble the remote
Snap the case back together and replace any screws. Why: a closed case protects from dust and moisture and maintains button alignment.
Tip: Do a quick test fit before fully tightening screws. - 7
Re-sync to the garage opener
Follow your opener’s re-sync procedure (often between holding a Learn/Program button and pressing a remote button). Why: remotes and openers must share a synchronized code to work reliably.
Tip: Model-specific steps vary; consult the manual or manufacturer support if unsure. - 8
Test the remote at multiple distances
Stand at typical entry and farthest reachable distance to confirm reliable operation. Why: confirms the replacement cured the symptom and identifies any remaining range issues.
Tip: If the range is inconsistent, consider rechecking battery seating or exploring interference sources.
Got Questions?
What are common signs a garage door remote battery needs replacement?
Common signs include reduced range, slower response, and intermittent opening. A blinking LED on the remote is another frequent indicator. If these occur, check the battery before pursuing other causes.
Look for reduced range, slow responses, or intermittent opening; an LED blink can also indicate a dying battery.
Can I use any battery type in my remote?
No. Most remotes use CR2032 coins, but some models require different sizes. Always consult the manual or check the inside of the old battery before replacing.
Most remotes use CR2032 coins, but verify your model before buying.
How do I re-sync a remote after replacing the battery?
Re-sync procedures vary by model. Typically, you press and hold a Learn or Program button on the opener and then press a button on the remote until the light indicates pairing.
Usually you press a Learn button on the opener, then press a remote button to pair.
What should I do if the remote still doesn’t work after replacement?
Verify the battery seating, check for interference, and ensure you’re using the correct pairing method. If issues persist, consult the manual or contact support.
If it still fails, recheck seating and pairing steps, then seek support if needed.
Is it safe for a typical homeowner to replace a garage door remote battery?
Yes, replacing a remote battery is generally safe when you follow basic precautions like removing metal jewelry, avoiding short circuits, and disposing of batteries responsibly.
Yes, with basic safety steps, replacing the battery is safe for homeowners.
Should I replace batteries in multiple remotes at once?
If you have several remotes for the same opener, consider replacing them in one session to minimize mismatch risk and ensure all remotes are paired similarly.
If you have several remotes, consider doing them together to save time.
Watch Video
Quick Summary
- Test symptoms before replacing the battery
- Use the correct battery type for your remote
- Re-sync with the opener after installation
- Check remote range after replacement
- Dispose of old batteries properly