How to Repair and Troubleshoot Chamberlain 045ACT Garage Door Opener
A homeowner-friendly guide to diagnosing and repairing the Chamberlain garage door opener model 045ACT, with safety checks, diagnostics, step-by-step repair workflow, and maintenance tips. Includes tools, FAQs, and programming guidance. Based on GarageDoorAdjust Analysis, 2026.

This guide helps homeowners diagnose, repair, and install a Chamberlain garage door opener model 045ACT. You’ll perform safety checks, inspect sensors, test limits and force, reset the opener, and reprogram remotes. Before you start, gather basic tools and confirm the door is balanced and the power outlet is functional. Follow these steps to reduce noise and ensure reliable operation.
Understanding the Chamberlain 045ACT and common failure modes
The Chamberlain garage door 045ACT is a popular residential opener that combines a robust motor with a safety-sensor system and a programmable remote. When functioning properly, it provides smooth, quiet operation, convenient remote control, and reliable safety features. However, like any mechanical/electronic system, it can experience issues that leave doors stuck, springs under tension, or remotes unresponsive. Common failure modes include the opener not responding to wall switch or remote, the door stopping mid-travel, sensors erroneously signaling a blocked door, or noisy operation due to lack of maintenance. According to GarageDoorAdjust, the 045ACT model relies on proper alignment, balanced door weight, safe sensor calibration, and correct travel limits. When one component is out of spec, the entire system may fail to operate correctly. In this guide, we’ll walk through practical checks, safe testing methods, and a clear repair workflow to restore proper function while minimizing risk. You’ll learn to distinguish electrical symptoms from mechanical issues, so you know when a DIY fix is appropriate and when to call a pro.
Key terms you’ll encounter include: safety sensors, limit switches, force limits, motor drive belt/chain, remote pairing, and door balance. As you work, remember that the goal is reliable, safe operation with minimal noise and smooth tracking along the tracks. The 045ACT requires a clear space, secure ladder use, and caution around moving parts. By following the steps in this article, homeowners can gain confidence in diagnosing and fixing common 045ACT issues without compromising safety. GarageDoorAdjust’s guidance emphasizes methodical testing and documenting any changes you make so you can revert if needed.
When in doubt, prioritize safety over speed; a small, well-documented adjustment often yields better results than a hasty replacement. For persistent problems or signs of wear beyond routine maintenance, consult the GarageDoorAdjust Team for personalized recommendations.
Safety prerequisites before you begin
Before touching any garage door components, ensure the following safety prerequisites are met:
- Disconnect power to the opener to prevent accidental activation. Unplug the unit from its outlet or switch off the dedicated circuit if accessible.
- Clear the area beneath and around the door. Keep children and pets away, and work in good lighting.
- Do not attempt any repair while the door is under load or suspended by springs; this is dangerous and can cause serious injury. If you hear abnormal creaks or see excessive door weight, stop and seek professional assistance.
- Wear safety glasses and gloves when handling metal parts, tracks, and springs. Use a sturdy ladder with a helper to stabilize it if you need elevated access.
- Have the owner’s manual or Chamberlain’s installation guide handy. It includes model-specific safety advisories and the recommended lubrication and maintenance schedule.
Once power is confirmed off and the area is clear, you’re ready to perform diagnostic checks and proceed with the repair workflow. As you test, document any symptoms, noise patterns, or sensor indicators to guide your next steps. This documentation also helps if you later need to call for professional service.
Diagnosing symptoms and root causes
Diagnosing Chamberlain 045ACT issues starts with pattern recognition. Here are common symptoms and their likely root causes:
- Opener doesn’t respond to wall switch or remote: could be a power issue, a dead remote battery, or a failed receiver circuit.
- Door won’t move or stops partway: usually indicates door balance issues, track obstructions, or safety sensor misalignment.
- Door opens/contracts slowly or stops before full travel: may be limit switch miscalibration or weak springs affecting balance.
- Alarm beeps or error codes on the opener: refer to the 045ACT’s user manual or logs, as error codes point to specific faults (e.g., sensor, safety, or circuit faults).
Root-cause analysis combines testing results and observation. Start with power, then test sensors, track clearance, and balance. If you know the door is well-balanced and tracks are clean, focus on the opener’s electronics, wiring, and remote programming. GarageDoorAdjust emphasizes a systematic approach: verify each subsystem before making adjustments to avoid chasing a symptom instead of the real problem.
A practical diagnostic checklist:
- Confirm power supply and outlet status with a multimeter or voltage tester.
- Inspect safety sensors for misalignment, dirty lenses, or obstruction in the sensor path.
- Manually test door balance by lifting to mid-height; if it falls or rises with ease, balance or springs may be compromised.
- Listen for grinding, belt/chain tension issues, or unusual noises when the door moves.
Document findings and proceed with step-by-step repairs in the recommended sequence to avoid creating new problems.
Step-by-step repair workflow (045ACT) overview
This section provides an overview of the repair workflow. The actual, detailed step-by-step actions are enumerated in the dedicated STEP-BY-STEP block, but understanding the flow helps you plan and execute safely. You’ll begin with a power check, ensure safety sensor alignment, verify door balance, adjust travel limits and force, and finish with reprogramming remotes if needed. Each phase should be approached methodically, with small, testable changes (never large, speculative adjustments). If any step reveals dangerous conditions (swinging springs, significant misalignment, or damaged tracks), stop and seek professional assistance. This structured approach reduces risk and improves the odds of a successful repair on the Chamberlain 045ACT opener.
The emphasis is on resetting and testing in incremental steps to confirm improvements before moving to the next stage. Keep a log of the settings you adjust and how the door responds in real time. If the door resumes normal operation after a particular adjustment, you’ve found your culprit. If symptoms persist, broaden the scope of inspection to include wiring connections, the garage door track alignment, and the hatch or electrical box that houses the opener circuitry.
Finally, after completing the repair steps, run a full safety and operation test: ensure the door stops when obstructed, recovers to fully closed position, and re-tests all remotes and keypad entries to verify proper pairing.
Maintenance and proactive care
Proactive maintenance reduces the likelihood of 045ACT issues recurring. A consistent care routine can extend the life of your opener and keep operation quiet and reliable. Here are practical maintenance recommendations:
- Lubricate moving parts every 6 months using a silicone-based lubricant on hinges, rollers, and tracks. Wipe away any excess to prevent dust buildup.
- Clean the track and sensors to remove dirt, spiderwebs, and debris that can misalign sensors or impede smooth travel.
- Inspect springs, bolts, and mounts for signs of wear or looseness. If you notice visible cracks, corrosion, or looseness, tighten bolts as per the manufacturer’s torque specs and replace worn parts.
- Test safety features monthly. The door should reverse direction when contacting a test object placed on the door path.
- Update remotes and keypad codes when needed to maintain secure access control and reduce interference from neighboring devices.
- Review the owner’s manual for model-specific lubrication intervals and any Chamberlain-provided maintenance schedule.
A routine maintenance habit also includes keeping cables and outlets free from moisture and dust. By integrating these checks into your regular home maintenance, you’ll minimize unexpected downtime and pricey repairs, and your 045ACT opener will perform more consistently over time. GarageDoorAdjust’s approach to maintenance emphasizes small, repeatable routines that yield measurable improvements.
Finally, if you notice persistent issues after routine maintenance, consider scheduling a professional inspection to verify the alignment of tracks, springs, and the overall system health. A professional assessment can detect subtle wear that DIY maintenance might miss.
Troubleshooting power, remotes, and programming
Power, remotes, and programming are common culprits behind malfunctioning openers. Here’s how to address them systematically:
- Power: Confirm the opener is receiving 120V AC or the correct circuit voltage. If the outlet is controlled by a switch, verify the switch is ON. Use a multimeter to confirm voltage at the receptacle. If power is unstable, reset the circuit breaker or replace a faulty outlet.
- Remote batteries: Replace worn batteries in remotes; ensure you’re using the correct remote for the 045ACT model and that the battery polarity is correct.
- Re-pairing remotes: With the opener in standby, press the Learn button on the motor housing, then press the remote button you want to pair. The light on the opener usually blinks to confirm successful pairing. Repeat for additional remotes.
- Keypad and external controls: If you have a keypad or external control, verify the code is correct and that the wiring to the keypad is intact. Some keypad failures are due to blown fuses or loose connections.
- Interference and range: Move the remote away from metal walls or large water pipes that can interfere with signal. If you still have limited range, try a different remote or replace the control board.
This troubleshooting keeps you aligned with a methodical approach rather than guessing at multiple potential causes. After addressing power, sensor alignment, and control programming, test the system with a few deliberate door cycles to confirm performance and safety.
Quick-start checklist for emergencies
If you need to handle a potential emergency related to a Chamberlain 045ACT opener, use this quick checklist to stay safe:
- Do not stand under a door that is not properly balanced or supported by springs.
- If the door is stuck in the open position, do not attempt to force it closed; check for obstructions and power issues, then call a professional if needed.
- Use a backup manual release only if you are trained and secure; never work from a ladder under a raised door.
- Always unplug the opener before inspecting electrical components, wiring, or the motor unit.
- Keep children and pets away from moving parts during test cycles.
By following these safety-focused practices, you minimize risk and help ensure that your troubleshooting remains both effective and safe. Remember that proper tool use, controlled testing, and adherence to the model’s manual are essential to a successful repair.
Tools & Materials
- DC-powered garage door opener (Chamberlain 045ACT) and user manual(Include model 045ACT for reference and its safety guidelines)
- Power screwdriver set (Phillips and flathead)(Essential for mounting screws and panel fasteners)
- Voltage tester or multimeter(Verify outlet voltage and test wiring safely)
- Ladder (6 ft or taller)(Use a stable ladder and have a helper when needed)
- Safety glasses and work gloves(Protect eyes from debris and hands from sharp edges)
- Silicone-based lubricant(Lubricate tracks, rollers, and hinges; avoid oil-based lubricants)
- Rags or paper towels(Clean excess lubricant and wipe tracks clean)
- Replacement batteries for remotes(Ensure remotes start with fresh power for reliable testing)
- Replacement parts (as needed)(Only if you identify worn components (casters, rollers, or weather seals))
Steps
Estimated time: 40-90 minutes
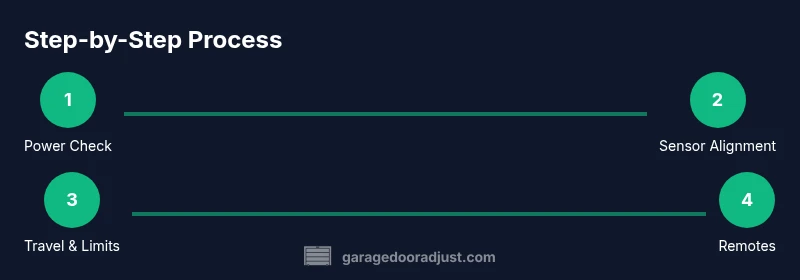
- 1
Power check and reset
Confirm the outlet is live or switch is ON; unplug the opener, wait 60 seconds, then plug back in to reset the control board. Test with the wall control after reset to see if the unit responds.
Tip: If the opener still doesn’t respond, verify the circuit breaker hasn’t tripped and inspect the outlet for visible damage. - 2
Test safety sensors alignment
Check the two safety sensors facing each other at the bottom of the door track. They should emit a solid indicator (often a green light). Clear any obstructions or dirt, and re-align if needed.
Tip: Use a straight edge or level to align the sensors precisely; small misalignments can prevent the door from closing. - 3
Check door balance and tracks
Disconnect the door from the opener by pulling the release handle, then manually lift to mid-height. The door should stay in place without dropping. If it drops, balance springs or tracks may need adjustment.
Tip: Never attempt to adjust springs without proper training; do not stand directly in the doorway while testing. - 4
Test and adjust limits and force
Use the limit and force adjustment screws on the opener unit to set the door’s travel distance and closing force. Make small adjustments, then test the door movement to ensure full travel and safe stopping.
Tip: Make incremental adjustments and re-test after each change to avoid overcorrection. - 5
Inspect drive mechanism and lubricate
Inspect the drive belt or chain for wear and tension; lubricate moving components with silicone spray, avoiding excessive lubrication that can attract dust.
Tip: Wipe away excess lubricant immediately to prevent residue buildup on tracks. - 6
Reprogram remotes and keypad
With power restored, re-pair remotes by pressing the Learn button on the motor housing and then pressing the remote. Do the same for any keypad or smart-home integration.
Tip: Test all remotes at a distance to confirm reliable communication; consider replacing batteries if signals weaken. - 7
Final safety test and re-connect
Plug the opener back in, run several cycle tests, and confirm the door reverses on contact with a test object. Ensure sensors respond properly and the door fully closes.
Tip: If any test fails, stop and re-check steps; persistent issues may indicate worn springs or structural problems requiring a professional.
Got Questions?
What is the Chamberlain 045ACT model?
045ACT is a Chamberlain residential garage door opener model used with standard residential doors. It combines a motor, safety sensors, and programmable remotes.
045ACT is Chamberlain’s residential garage door opener model with safety sensors and programmable remotes.
Why won’t my Chamberlain 045ACT open or close?
Common causes are power issues, misaligned safety sensors, faulty remotes, or miscalibrated travel limits. Inspect these subsystems first before pursuing more complex repairs.
Power, sensors, remote programming, and travel limits are the usual suspects. Check those first.
How do I reset the Chamberlain 045ACT opener?
Unplug the unit, wait 30-60 seconds, then plug it back in and re-pair remotes following the Learn button procedure.
Unplug, wait a moment, plug back in, and re-pair your remotes using the Learn button.
Can I repair the springs or tracks myself?
Spring and track work is dangerous; if you suspect wear or damage, contact a professional technician for safety.
Springs are hazardous; call a pro if you suspect wear or damage.
What tools are essential for 045ACT maintenance?
Keep a screwdriver set, ladder, voltage tester, safety glasses, silicone-based lubricant, rags, and fresh batteries for remotes.
Screwdriver set, ladder, tester, safety glasses, silicone spray, rags, and fresh remote batteries.
How often should I lubricate tracks and rollers?
Lubricate during routine maintenance according to the manufacturer’s guidelines; avoid over-lubricating and keep tracks clean.
Lubricate per the manual; don’t overdo it and keep tracks clean.
Watch Video
Quick Summary
- Assess the door’s safety features before adjustments.
- Balance and track alignment are critical to smooth operation.
- Adjust limits and force in small increments and test often.
- Program remotes after completing mechanical fixes.
- If springs or structural components show wear, call a pro.