Insulating a Garage: Step-by-Step Guide
Learn how to insulate a garage effectively to reduce energy loss, improve comfort, and protect your belongings. This expert guide covers materials, methods, safety, and a clear plan for DIY or professional help.

By following this guide, you will master insulating a garage for comfort and energy savings. You’ll learn how to seal gaps, choose insulation types, protect moisture, and install door and wall insulation with a step-by-step plan. Start with a quick assessment, select materials, and implement a layered approach for best efficiency. The process covers ceilings, walls, and doors, with safety checks for wiring and ventilation.
Why insulating a garage matters
According to GarageDoorAdjust, insulating a garage isn’t just about comfort—it’s core to energy efficiency and long-term durability of your home. A well-sealed, properly insulated space reduces heat transfer, which lowers heating and cooling costs. In attached garages, temperature swings can influence living spaces adjacent to the garage, causing drafts, condensation, and higher humidity. Beyond energy, insulation improves sound dampening, helps protect stored items from extreme temperatures, and decreases wear on your garage door system by reducing the heat load during operation. When homeowners decide to insulate a garage, they often discover benefits such as quieter operation and less frost near door tracks in winter. This section explains why taking the time to insulate a garage is worthwhile and how it ties into the broader home envelope. The approach described here aligns with best practices advocated by the GarageDoorAdjust Team.
In climates with cold winters and hot summers, the envelope of your garage is a key control surface. Insulation acts as a barrier to slow down heat flow, while air sealing reduces unintended air movement that carries heat and moisture. For attached garages, the envelope includes the garage walls and ceiling as well as the door opening itself. Even modest improvements—like sealing gaps around windows and door frames and choosing mid-range insulation products—can yield noticeable comfort and energy benefits over time. Think of insulating a garage as part of a whole-house strategy, not a standalone project; the gains compound when paired with weather stripping and door insulation. GarageDoorAdjust’s guidance emphasizes planning and safety as the foundation of a successful project.
When the project is done well, you’ll experience steadier temperatures in the space, less cold drafts near the door during winter, and reduced heat gain in summer. A well-insulated garage can also contribute to a healthier indoor environment by minimizing condensation paths that foster mold growth on walls or stored items. If you store tools, bikes, or seasonal equipment in the garage, insulation helps protect those belongings from extreme swings. Finally, insulating a garage properly can extend the life of your heating and cooling system by reducing demand during peak hours, which translates into more reliable performance for the rest of your home.
note':''} ,
Tools & Materials
- Measuring tape(At least 25 ft. for walls and ceiling measurements)
- Pencil and notepad(For marking stud locations and cut lines)
- Utility knife(Sharp blade for cutting batt insulation and foam boards)
- Drywall saw or oscillating tool(Optional for wall cavities if removing drywall)
- Caulking gun(Silicone or acrylic caulk for gaps around penetrations)
- Spray foam sealant (optional)(For larger gaps you cannot seal with caulk)
- Staple gun(To hold batts in place in wood-framed walls)
- WeatherStripping material(Door seals and garage door perimeter weatherstripping)
- Insulation batts/rolls(Choose appropriate R-value for climate; consider mineral wool or fiberglass)
- Rigid foam boards(For doors or high-bridging areas)
- Vapor barrier (poly sheeting)(Needed in some installations to deter moisture diffusion)
- Safety gear(Gloves, eye protection, and a mask/respirator)
- Sealant/adhesive for foam boards(Keeps boards in place and seals edges)
- Ladder or scaffold(Access ceiling and high wall areas safely)
Steps
Estimated time: 6-10 hours
- 1
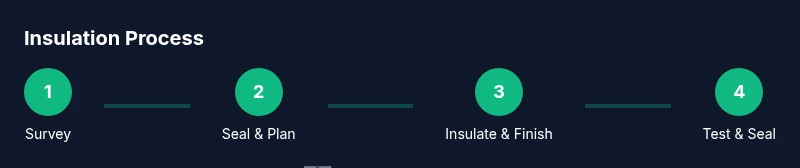
Survey and plan
Measure the garage interior, note door openings, and identify potential thermal bridges. Create a rough material list and a costing plan. Decide whether you’ll insulate walls, ceiling, and/or the door. Plan drainage and moisture considerations to prevent future issues.
Tip: Take photos of wall cavities and door thresholds to guide material cuts. - 2
Seal gaps and weatherproof
Before adding insulation, seal cracks around the door frame, windows, and utility penetrations with caulk or expanding foam. This reduces air leakage and helps insulation perform as intended.
Tip: Focus on the top plates and rim joists, which are common air-leak points. - 3
Choose insulation strategy for walls
Decide between fiberglass/mineral wool batt insulation or rigid foam boards. Batt insulation is easier for typical stud walls, while rigid foam is great for air sealing and bridging gaps.
Tip: If you’re sensitive to fiberglass dust, consider mineral wool or pre-cut batts with protective covers. - 4
Prepare wall cavities/ceiling space
Remove obstructing items, test for moisture, and repair any leaks. Clean the surface and ensure studs are accessible for batt installation. If your ceiling is unfinished, prep for attic-style insulation with a top-down approach.
Tip: Ensure electrical boxes are accessible and safe to work around. - 5
Install insulation in walls
Place batts between studs, cut to fit around outlets and corners, and secure with staples. Avoid compressing batts, which reduces R-value. Seal joints with tape or foam where required.
Tip: Keep a small venting space near outlets to prevent moisture buildup. - 6
Insulate the garage door and gaps
Apply door insulation panels or rigid foam to the door panels, ensuring proper fit and securement. Install weatherstripping around the door perimeter to minimize drafts.
Tip: Don't obscure the door’s track or mechanism; maintain safe operation. - 7
Seal edges and install vapor barrier
Seal exposed edges with foam or caulk and install a vapor barrier if required by climate. Make sure it overlaps seams and remains breathable where needed.
Tip: Roof and wall penetrations should be sealed to prevent air migration. - 8
Inspect and test
Re-check all seals, ensure there’s no visible gaps, and perform a simple energy check by feeling for drafts near doors and windows. Monitor moisture in the garage for a week after completion.
Tip: Take a before/after photo set to compare improvements.
Got Questions?
Can I insulate a garage myself, or should I hire a pro?
Both are feasible. A DIY approach works for standard walls and a well-sealed ceiling, but larger or moisture-prone spaces may benefit from a pro’s assessment and professional-grade materials.
You can insulate a garage yourself if you follow safety guidelines and use proper materials; for complex spaces, consider consulting a pro.
What insulation is best for an attached garage?
Fiberglass or mineral wool batts are common for walls, while rigid foam boards work well for air sealing and bridging gaps. For doors, insulated panels or foam kits improve comfort.
Fiberglass or mineral wool batts for walls, rigid foam for sealing, insulated door panels for the door.
Do I need a vapor barrier in a garage insulation project?
A vapor barrier is recommended in areas with high humidity or specific climate conditions. Follow local codes and ensure it’s installed on the warm side of the insulation where applicable.
A vapor barrier helps control moisture; check your climate guidelines to decide if you need one.
Is weather-stripping enough to insulate the garage door?
Weather-stripping helps reduce drafts, but for best results, combine it with insulated door panels or foam inserts. Don’t rely on weather-stripping alone for large temperature changes.
Weather-stripping helps a lot, but for big gains, add insulated panels or foam inserts.
How long does the insulation project take?
Time varies by space and method, but a typical project can take several hours to a full day, depending on preparedness and whether walls or doors are pre-finished.
Expect a few hours to a full day depending on space and chosen materials.
Will insulating a garage reduce energy bills?
Insulation reduces heat transfer and improves comfort, which lowers heating and cooling demand. The exact savings depend on climate, home design, and how completely the space is sealed.
Yes, insulation generally lowers energy use, but the amount depends on your climate and how well you seal the space.
Watch Video
Quick Summary
- Seal air leaks before adding insulation
- Choose insulation type based on walls vs. ceiling
- Insulate the garage door for best results
- Check moisture and ventilation to prevent mold
- DIY insulation is feasible with planning and safety