Garage Door Cable Broken: A Homeowner's Step-by-Step Guide
Learn how to diagnose, secure, and replace a broken garage door cable safely. This educational guide covers common causes, essential tools, a detailed repair workflow, safety tips, and when to hire a professional.

If you suspect a garage door cable broken, stop using the door, unplug the opener, and secure the area. This guide provides a safe diagnosis, replacement steps, and warnings on when to hire a pro. You’ll learn common causes, required tools, and a clear repair sequence.
What a garage door cable broken means for safety and operation
A garage door cable broken is a serious safety concern because the door’s balance depends on cables that carry most of the door’s weight. A broken cable can lead to sudden door movement, a detached door from its track, or a door dropping unexpectedly. According to GarageDoorAdjust, cables under high tension can snap without warning, posing risk to people and property nearby. Look for frayed strands, a visibly slack section, or a detached cable end near drums or pulleys. If you notice any of these signs, do not attempt to operate the door and immediately secure the area. This section explains why the failure happens and how immediate steps can prevent additional damage or injury.
Safety-first protocol before any inspection
Before you touch anything, unplug the garage door opener and keep children and pets away from the workspace. Wear safety glasses and thick work gloves to protect your eyes and hands from sharp cables under tension. If the door is partially open, support it with clamps or braces on the tracks to prevent sudden movement. Never stand under a door supported only by springs or cables that could fail. The goal is to create a stable, controlled environment for a careful inspection and replacement. The GarageDoorAdjust Team emphasizes that approaching a damaged system with caution reduces the risk of injury and avoids costly mistakes.
Common causes and design challenges linked to cable failure
Cables fail for several reasons that homeowners should understand. Worn or frayed strands weaken the cable, especially near the drum where tension concentrates. Misalignment of tracks or drums can cause uneven load distribution, accelerating wear. Temperature fluctuations and rust from humidity can also degrade cables over time. The door’s weight itself, plus the age of torsion springs, contributes to cumulative stress on the cables. By recognizing these patterns, you can schedule preventive maintenance, replace aging components before a disaster, and avoid ad hoc improvisations that jeopardize safety.
How to prepare for a repair: planning and safety
Effective repairs start with planning. Confirm the door type (torsion vs extension), identify the correct cable length and rating, and gather the required tools. Mark a clear workspace, ensure a stable ladder, and set aside enough time for a thorough job. If you have a manual or manufacturer guide, review the recommended torque and winding directions. Always assume that parts under tension can snap; treat any component connected to drums or springs with respect. This preparation reduces surprises and helps you execute each step with confidence.
Detailed inspection: what to check before replacing a cable
Begin with a visual and tactile inspection of all related hardware: drums, pulleys, tracks, and springs. Look for frayed ends, bent drums, or cracked pulleys, which indicate broader wear. Check the door balance by manually lifting the door in a supported position—if it feels heavy or unbalanced, the springs or drums may be worn. Confirm that the anchor brackets and mounting screws are tight and not corroded. A thorough inspection helps prevent replacing a cable while other worn components remain in service, which could lead to another failure soon after repair.
Replacing the broken cable: fundamental considerations for DIY safety
If you decide to replace the cable yourself, ensure you obtain the exact cable specification for your system and replace it with components rated for the door’s weight. Do not improvise with a mismatched cable or makeshift fasteners. Start by releasing any remaining tension and carefully detaching the broken section. Thread the new cable through the drums and pulleys along the correct path, avoiding sharp kinks. Recheck all connections as you go. Remember that a cable replacement requires precise tensioning to restore safe balance, so proceed with patience and deliberate steps. The GarageDoorAdjust Team recommends seeking professional help if any doubt remains.
Re-tensioning, testing, and final safety checks
After installing the new cable, re-tension the system according to your door’s specifications, usually with the winding bars engaged at the drum. Slowly operate the door to test movement, listening for unusual noises and feeling for improper resistance. Check alignment in the tracks and ensure the door stays evenly balanced across its range. Lubricate moving parts as recommended by the manufacturer, and inspect fasteners again after several cycles. A successful test should show smooth operation without jerking, and the door should stay in a partially opened position without drifting.
When to escalate: recognizing signs you need a pro
If you are unsure about any step, feel uncertain with high-tension components, or notice twisted drums, bent brackets, or uneven balance after a test, stop and call a professional. Replacing a broken cable without adequate safety measures can result in severe injuries or door damage. A qualified technician can safely re-tension, replace damaged springs, and verify overall system integrity. The GarageDoorAdjust Team emphasizes that while DIY repairs can save money, some scenarios are beyond safe home repair and require expert attention.
Maintenance practices to prevent future failures
Preventive maintenance goes a long way in extending door life. Schedule periodic inspections of cables, drums, pulleys, tracks, and springs. Lubricate moving parts with manufacturer-approved lubricants and wipe away grime that can accelerate wear. Tighten mounting hardware to prevent looseness, and check balance periodically by manually lifting the door to ensure it remains steady. By instituting a routine, you can catch wear early, replace aging components, and reduce the risk of sudden cable failure. GarageDoorAdjust recommends annual checks as a practical baseline for most homes.
Tools & Materials
- Safety glasses(Industrial-grade protection)
- Work gloves(Thick leather or reinforced fabric)
- Stepladder(Stable, tall enough for access)
- Socket wrench set (metric/imperial)(Includes torque range for mounting screws)
- Pliers and cable cutters(For gripping and trimming cable ends)
- Replacement garage door cable (correct weight rating)(Same length and drum routing)
- Winding bars (for torsion systems)(Used to wind/unwind springs safely)
- Cordless drill or driver(Optional for fasteners)
- Clamps or braces(To hold tracks in place during work)
- Lubricant (manufacturer-approved)(For tracks and hinges after replacement)
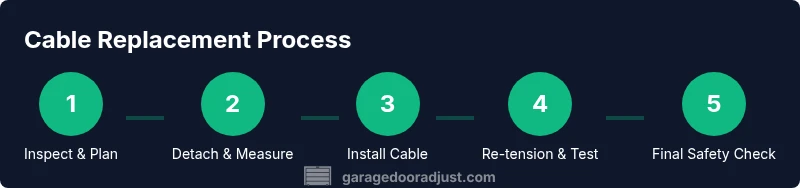
Steps
Estimated time: 45-75 minutes
- 1
Secure the workspace
Clear the area beneath the door, unplug the opener, and place clamps on the tracks to prevent accidental movement. Ensure a stable ladder and all bystanders are clear. This step reduces the risk of injury during subsequent actions.
Tip: Use a spotter if you must work near uneven ground or stairs. - 2
Release residual tension safely
With the door supported, carefully release any residual tension by following manufacturer instructions. Do not force components; if you hear creaks or see sudden movement, stop and reassess.
Tip: Keep hands clear of the spring area; springs can snap unexpectedly. - 3
Detach the broken cable ends
Loosen cable clamps at the drum and disconnect the broken segment. Inspect for additional fraying and ensure the cable path is clear of obstructions before installing a new cable.
Tip: Label or photograph the path to help accurate re-routing. - 4
Inspect supporting hardware
Check drums, pulleys, brackets, and tracks for wear or deformation. Replace any compromised parts before installing the new cable to avoid repeat failures.
Tip: Do not reuse bent drums or damaged pulleys. - 5
Prepare the replacement cable
Measure the door height and match the new cable length and weight rating. Cut only if you have the correct equipment and confirm routing matches the original path.
Tip: Never shorten a cable or substitute with a thinner wire. - 6
Install the new cable
Thread the cable through drums and pulleys, reattach ends securely, and keep the cable aligned with the track. Tighten clamps gradually and check for kinks or sharp bends.
Tip: Take your time to avoid pinching or misrouting. - 7
Re-tension using proper tools
Use winding bars to re-tension torsion springs per the door's specifications. Carefully monitor for even tension around both drums.
Tip: Never rely on pliers or makeshift tools for winding. - 8
Test operation and finalize safety checks
Lower and raise the door slowly, observe balance, and check track alignment. Lubricate moving parts and secure all fasteners after successful cycling.
Tip: If the door drifts or binds, stop and re-evaluate the setup.
Got Questions?
What are the signs that a garage door cable is broken?
Common signs include frayed or loose cables, a door that won’t stay balanced, unusual noises, or the door dropping when releasing the opener. If you observe these, stop using the door and assess safety before proceeding.
Look for frayed cables, bed rust, and a door that won’t stay in place after you release it.
Can I fix a broken garage door cable myself?
DIY replacement is possible for experienced homeowners with proper tools and safety measures. If you’re unsure about tensioning springs or the routing path, it’s safer to hire a professional.
Only attempt DIY if you’re comfortable with high-tension systems and have the right equipment.
Is it safe to operate a garage door with a broken cable?
No. A broken cable can cause sudden door movement or collapse. Do not operate the door until the cable is replaced and the system is re-tensioned by a qualified person if necessary.
No—operating the door with a broken cable is unsafe and should be avoided.
Should I replace both cables at once?
If one cable is broken, inspect the other for wear. Replacing both cables ensures balanced tension and reduces the risk of a second failure soon after repair.
Often, replacing both cables at the same time helps maintain balance.
How long does a cable replacement take?
A typical replacement can take about 45-60 minutes for a homeowner with the right tools, though additional time may be needed if other components show wear.
Most replacements take under an hour when you follow proper steps.
When should I hire a professional?
If you’re uncertain about safely handling high-tension springs, or if screws, drums, or brackets appear damaged, call a professional to prevent injury and ensure proper re-tensioning.
If you’re unsure about tension or safety, hire a pro.
Watch Video
Quick Summary
- Stop using a door with a broken cable
- Use proper tools and follow safety protocols
- Replace cables with correct ratings and avoid improvisation
- Test thoroughly and seek professional help if unsure
- Regular maintenance helps prevent future failures