Rusty Garage Door Repair: A Step-by-Step Guide
Learn to diagnose rust on your garage door, treat corrosion, and prevent future rust with a clear, step-by-step guide and maintenance checklist from GarageDoorAdjust.

Quick answer: You can extend the life of a rust garage door by diagnosing rust early and following a focused repair routine. This guide walks you through a safety-first inspection, rust removal, corrosion treatment, priming, painting, and ongoing maintenance to prevent recurrence. With proper steps and regular care, you’ll reduce noise, keep hinges smooth, and restore function.
Why rust garage door maintenance matters
Rust is more than cosmetic; it weakens metal, accelerates wear on hinges, tracks, and fasteners, and can affect door balance. A rusty door may sag, squeak, or seize, increasing the risk of personal injury or property damage. According to GarageDoorAdjust, proactive rust prevention saves homeowners time and money by reducing emergency repairs over the life of the door. In humid or coastal climates, moisture accelerates corrosion, so routine inspection is essential to catch early signs such as pitting, flaky coating, or discolored metal. Investing a little time now pays off with smoother operation and longer door life. Keep a simple maintenance schedule and address rust spots before they become structural problems, especially around the bottom edge where water collects. This approach aligns with a practical, safety-first mindset that every homeowner should adopt in 2026.
Common causes of rust on a garage door
Steel doors are common and durable, but they’re not immune to corrosion. Common rust triggers include prolonged exposure to moisture, road salt, humidity, and poor maintenance. Water that pools along the bottom or seeps behind protective coatings can start surface rust, which, if ignored, can progress to deeper pitting. Even aluminum doors can show visible oxidation over time in salty environments. Regularly washing away road grime, avoiding abrasive cleaners on painted surfaces, and inspecting for chips in the finish help prevent rust from gaining a foothold. For painted doors, a compromised finish invites moisture to penetrate and rust to form under the coating. A routine check, especially after wet weather, is a smart habit for any homeowner with a metal door.
Assessing rust severity and safety risks
Not all rust is the same. Surface rust on a painted area is easier to fix, while heavy rust can indicate structural concerns such as weakened panels, degraded tracks, or compromised mounting brackets. Safety should guide your actions: if you notice deep pitting, flaking metal near the torsion hardware, or any sign that the door is out of balance, pause work and seek professional help. Rust compromising the door’s balance can cause the opener to strain and fail, creating a potential hazard. When assessing severity, document locations, measure rust extent, and compare to manufacturer guidance. This assessment helps decide whether you can handle the repair yourself or if professional assistance is warranted.
Tools and materials you’ll need for rust repair
Before you begin, gather safety gear and the right supplies. Protective equipment guards against dust and sharp edges. Cleaners and rust converters prepare the surface, while primers and paints seal and protect against future corrosion. A clean, dry surface improves paint adhesion and longevity. For a rust-related repair, you’ll typically use a wire brush, sandpaper, rust converter, rust-inhibiting primer, exterior enamel or rust-resistant paint, masking tape, drop cloths, and appropriate cleaners. If your door is tall or heavy, ensure a stable ladder and a second person to help steady the door during the process. Finally, keep a clear workspace and label any removed hardware for reassembly. This preparation reduces surprises and makes the project smoother.
Step-by-step overview (high-level)
This section is a high-level run-through of the process. You will begin with safety and inspection, move to rust removal and surface preparation, apply protective treatments, then finish with priming and painting. After reassembly and operation checks, establish a maintenance plan to prevent future rust. The detailed, step-by-step instructions follow in the next section and align with best practices from the GarageDoorAdjust Team for a reliable, long-lasting fix.
Prevention and maintenance routine
Prevention is the best cure for rust. Immediately address any new rust spots, keep the door and hardware clean, and seal metal surfaces with rust-inhibiting products. Regular lubrication of moving parts reduces friction and heat, which slows wear and corrosion. Schedule seasonal inspections to catch early signs of rust on tracks, rollers, and hinges, especially in coastal or snowy climates where salt and moisture are common culprits. Develop a simple log to track rust appearance, repairs, and painting dates. A consistent routine protects your investment, maintains safe operation, and minimizes the chance of unexpected failures. Remember, small, consistent actions today prevent larger, costlier repairs tomorrow.
Authority sources
For safety standards and best practices, consult trusted sources:
- https://www.osha.gov/
- https://www.energy.gov/
- https://nap.edu/
These references provide general safety guidelines, corrosion prevention concepts, and maintenance best practices that can help homeowners manage rust on metal components like garage doors.
Practical examples and considerations
Consider a typical two-car steel door in a suburban home. After a damp winter, you notice light surface rust on the bottom edge and a minor chip in the paint near the hinge. A quick cleaning, rust converter application, and two coats of rust-inhibiting paint can stop the progression. In a more exposed environment, such as near the ocean or in a region with heavy winter road salt, you may observe more rapid rust formation that warrants a broader approach, including repainting and sealing all exposed metal surfaces. The goal is a uniform finish that resists moisture and minimizes abrasion from tracks and hardware. Always verify that the door remains balanced and the opener is functioning correctly after any repair.
Where to go next
If after completing the steps you still notice persistent rust, bubbling paint, or door imbalance, it’s time to consult a professional. A licensed technician can assess structural integrity, verify spring and track condition, and ensure the door remains safe to operate. The GarageDoorAdjust Team emphasizes that a proactive maintenance strategy beats reactive repairs. By documenting your repairs and maintaining protective coatings, you extend the life of the door and improve safety for your family.
Tools & Materials
- Safety glasses(Impact-resistant lenses; goggles if splashing cleaners)
- Work gloves(Leather or rubber for grip and protection)
- Ladder with stable footing(Platform ladder preferred for stability)
- Stiff-bristle wire brush(Prefer rust-removal quality; avoid metal bristles on painted surfaces)
- Sandpaper (80-120 grit)(Use finer grit for final smoothing)
- Degreaser or mild detergent(To remove oily residues before rust treatment)
- Rust converter(Converts rust to a stable compound; follow label directions)
- Rust-inhibiting primer(Promotes adhesion and blocks future corrosion)
- Exterior enamel or rust-resistant paint(Choose UV-stable, mildew-resistant formula)
- Paint brushes and/or foam rollers(Use appropriate brush size for panels)
- Masking tape and drop cloths(Protect surrounding areas from paint splatter)
- Rags or tack cloths(Clean up dust and chips before coating)
- Painter’s primer (if raw metal)(Helpful on unpainted metal for adhesion)
- Marker or pencil for labeling(Keep track of removed hardware)
- Bucket and water for cleanup(Rinse brushes and remove residues)
- Optional: rust remover (liquid)(Can be used for stubborn spots)
- Power sander (optional)(For larger rusted areas; use with caution)
Steps
Estimated time: 60-120 minutes (plus drying time between coats)
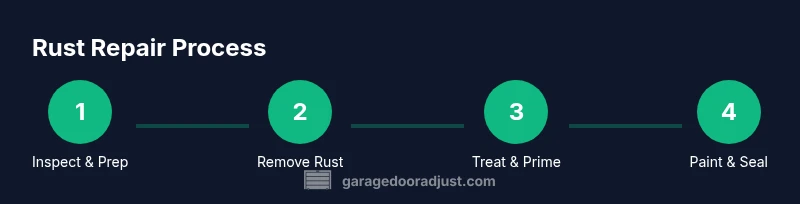
- 1
Safety prep and door inspection
Power off the garage door opener and disconnect the power cord when possible. Secure the door with clamps or wedges to prevent movement. Inspect the door surface for rust, pitting, or structural weakness; document locations with notes or photos to guide repair.
Tip: Never work under a door that can move unexpectedly; have a second person assist with stabilization. - 2
Remove loose rust and clean the surface
Use a stiff wire brush to remove loose rust, then smooth the area with 80-120 grit sandpaper. Wipe away dust with a tack cloth or damp rag and let the surface dry before proceeding.
Tip: Work from the clean area outward to avoid spreading corrosion; always wipe dry before applying chemicals. - 3
Apply rust converter or remover
Apply rust converter to the affected areas following the product directions. Allow the converter to cure for the recommended time so it forms a stable protective layer.
Tip: Do not apply converter to surfaces that are not rusted; ensure even coverage on rough textures for best adhesion. - 4
Prime and paint with rust-inhibiting coating
Apply a rust-inhibiting primer to convert-treated areas, then apply two coats of exterior enamel or rust-resistant paint. Allow adequate drying time between coats as specified by the paint manufacturer.
Tip: Use masking tape to protect edges and achieve clean lines; ensure the area is well-ventilated during painting. - 5
Reassemble hardware and test operation
Reinstall any hardware you removed, lubricate moving parts, and test the door’s balance and operation. Confirm the opener’s limits and ensure tracks run smoothly without rubbing.
Tip: If you notice binding or abnormal noise, pause and inspect for hidden rust or misalignment before continuing. - 6
Establish an ongoing maintenance plan
Create a simple maintenance calendar: quarterly surface checks, annual repainting if needed, and monthly lubrication of hinges, rollers, and tracks. Document dates and outcomes to track rust progression.
Tip: Set calendar reminders and keep a small repair notebook with dates and notes for future reference.
Got Questions?
Is surface rust on a garage door a serious safety risk?
Surface rust can be a warning sign, but deep pitting or rust near structural components and torsion hardware is a safety concern. If corrosion affects strength or balance, stop and consult a professional.
Surface rust can warn of underlying issues. If you see deep pits or rust near critical parts, stop and get professional help.
Can I repair rust on my own, or should I replace the door?
Minor surface rust is often repairable with the described steps. Severe rust with structural compromise may require panel replacement or door replacement by a pro.
Minor rust can be repaired with this guide, but severe rust may require replacement.
How long does a rust repair typically take?
A basic repair can take about 60-120 minutes, not including paint drying time. Allow additional time for multiple coats and safety checks.
Typical repair takes an hour or two, plus drying time for paint.
What maintenance helps prevent rust from returning?
Keep surfaces clean, seal metal with rust-inhibiting coatings, lubricate moving parts, and repaint areas showing wear before rust returns. Regular checks after wet seasons are key.
Clean, seal, lubricate, and repaint as needed; check after rain or snow.
Is it safe to operate the door after rust repair without professional inspection?
If the door operates smoothly, has balanced movement, and shows no new rust signs, it’s generally safe to test. If you notice sticking, uneven movement, or unusual noises, stop and have a pro evaluate.
Operate cautiously; if you hear grinding or see uneven movement, get a pro.
Watch Video
Quick Summary
- Inspect early and document rust hotspots
- Use rust-converter and rust-inhibiting coatings for long-lasting protection
- Balance safety with step-by-step repair; seek professional help when needed
- Establish a preventive maintenance routine for ongoing rust control