Garage Door Repair Columbus: A Homeowner’s Step-by-Step Guide
A comprehensive, safe, step-by-step guide for diagnosing and repairing common garage door issues in Columbus, including when to DIY and when to call a pro. Learn from GarageDoorAdjust with practical, local context.

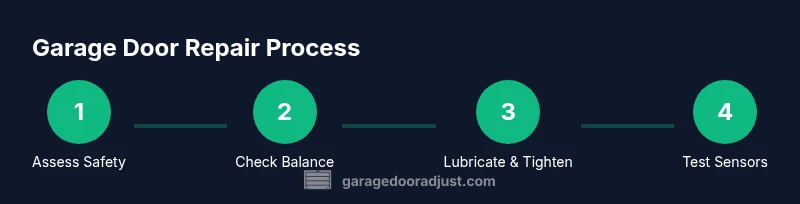
By following this guide, you will diagnose common garage door problems in Columbus, determine whether simple fixes apply, and safely complete basic repairs or prepare for professional service. According to GarageDoorAdjust, joining this approach reduces callouts and improves safety by addressing balance, lubrication, and sensor checks first. This quick answer shows the essential steps, tools, and safety precautions homeowners in Columbus should follow before calling a technician.
Common Garage Door Problems in Columbus
In Columbus homes, the most frequent garage door issues involve the door failing to open or close completely, opening unevenly, or making unusual noises. The climate here—humid summers and cold winters—accelerates wear on tracks, rollers, weather seals, and springs. You may notice doors that sag, grip too tightly on one side, or rebound after closing. If the door is not stopping where you expect, the limit switch on the opener may be misadjusted or the door’s balance is off. Cracked weatherstripping can allow drafts and debris to enter, while damaged tracks can cause the door to rub or bind.
Safety header: Always disconnect power to the opener before inspecting the door to avoid unexpected movement. Push the door manually to test balance; a heavy door that does not stay in place indicates a spring or balance problem that requires professional attention. Understanding these symptoms helps you decide whether a quick DIY fix is viable or if a pro should be called.
Diagnostic Checklist for Your Door and Opener
A practical diagnosis is the first step before any repairs. Use this checklist to identify which components may need attention. In Columbus, seasonal changes can affect balance, tracks, and weather seals, so regular checks save time and money.
- Visually inspect tracks for dents, bends, or loose mounting screws. Misaligned tracks can cause binding and wear.
- Manually test door balance: with the door closed, pull the emergency release and try lifting the door halfway. It should stay put. If it drops or rises, balance is off and springs or cables may need adjustment by a pro.
- Check door hardware: tighten loose screws on hinges, brackets, and pulley assemblies.
- Inspect safety sensors: ensure sensors face each other and no objects block the beam. A misaligned sensor can stop the door from closing.
- Listen for grinding, squeaks, or hesitations during operation; these noises point to rollers, hinges, or track issues.
- Test the opener: reconnect power and run the door through a full cycle to verify opener limits and reversing function. If the door behaves unexpectedly, stop and reassess.
- Note weather seals and weatherstripping wear; replace as needed to improve energy efficiency and prevent debris ingress.
Important safety reminder: never attempt torsion-spring adjustments yourself. Springs are under extreme tension and require specialized training and tools.
Repair Tactics You Can Safely Try (Non-Destructive)
Many Columbus homeowners can perform non-destructive maintenance to extend life and improve operation without touching dangerous springs. Focus on cleaning, lubrication, and tightening.
- Clean and lubricate moving parts: Apply a silicone-based spray to rollers, hinges, and track joints. Wipe away excess to prevent dust buildup.
- Tighten loose hardware: Re-tighten mounting bolts on tracks, hinges, and brackets. Loose hardware is a common cause of misalignment and noise.
- Replace weatherstripping: If worn, cracked, or missing, replace weather seals to improve operation and energy efficiency.
- Realign tracks and gentle adjustments: If a track is slightly out of alignment, loosen the mounting screws, shift the track, then re-tighten. Do not force tracks—small, steady adjustments work best.
- Test safety features after each change: Reconnect power and run a test cycle to confirm improvements without risking misalignment or binding.
If you hear grinding or see rubbing around rollers, or if doors bind during movement, pause and consider professional service for assessment of rollers, bearings, and especially springs.
When to Call a Pro in Columbus
Some issues demand professional evaluation, especially when springs, cables, or torsion systems are involved. In Columbus, local codes and safety practices require careful handling of high-tension components. If you notice any of the following, contact a licensed technician: persistent door imbalance, loud banging or jerky movement, visible wear on springs or cables, or a sensor system that won’t align correctly after adjustments. A pro can perform spring balance checks, torsion spring replacements, track alignment, and opener programming with proper safety protocols. GarageDoorAdjust’s guidance emphasizes safety-first decisions and knowing when to escalate.
Authority Sources
For safety standards and best practices, refer to established authorities:
- OSHA: https://www.osha.gov
- U.S. Department of Energy: https://www.energy.gov
- This Old House: https://www.thisoldhouse.com
These sources provide general guidelines on home safety, energy efficiency, and repair best practices that support your DIY decisions in Columbus.
Additional Resources for Columbus Homeowners
Local resources and general repair knowledge can help you make informed decisions. Always verify the compatibility of replacement parts with your specific door model and opener brand. If your door is under warranty, consult the manufacturer for approved service options before attempting any fixes.
Authority and Safety Warnings
This guide emphasizes safety first. Do not attempt to modify torsion springs, cut cables, or perform structural alterations without professional training. Always disconnect power to the opener when inspecting components and wear protective eyewear during any maintenance tasks.
How a Pro-Grade Fix Is Different
A pro-grade repair involves precise balance measurements, correct spring tension, and correct sensor calibration. It minimizes risk and extends the life of your door. If in doubt, schedule a professional inspection and use this guide to understand the steps a technician will take.
Tools & Materials
- Hammer and screwdriver set(Phillips and flat-head; for hinges and track screws)
- Socket wrench set(For mounting bolts on tracks and brackets)
- Ladder(Stable, non-slip, tall enough to reach tracks)
- Silicone-based lubricant spray(Avoid oil-based lubricants on aluminum tracks)
- Rags and mild cleaner(Remove dirt before lubricating)
- Non-contact voltage tester(Verify power is off to the opener unit)
- Replacement weatherstripping(If worn door bottom seal is compromised)
- Replacement rollers (if worn)(Only for non-torsion spring systems; consult a pro)
- Safety glasses(Eye protection during maintenance)
Steps
Estimated time: 45-60 minutes
- 1
Disconnect power and secure the door
unplug or switch off the garage door opener. Engage the manual release and secure the door to prevent accidental movement during inspection.
Tip: Never work on a door while power is connected; a sudden movement can cause injury. - 2
Test door balance manually
With the door closed, pull the emergency release and lift the door to about halfway. It should stay put; if it moves, balance or springs require professional adjustment.
Tip: Do not attempt to adjust springs yourself; this is high-tension equipment. - 3
Inspect tracks, rollers, and hardware
Look for dents, bends, or loose screws. Gently realign tracks and tighten hardware; replace damaged rollers if you have the right training.
Tip: Use the ladder safely and avoid over-tightening screws, which can strip threads. - 4
Lubricate moving parts
Apply a light silicone lubricant to rollers, hinges, and track joints. Wipe away excess to prevent dust buildup.
Tip: Do not lubricate the belt or chain if your system uses a belt-driven opener. - 5
Test safety sensors and limits
Reconnect power and run through a full cycle. Place an object in the sensor path to test auto-reverse; adjust sensor alignment if needed.
Tip: If the indicator light on the sensors is off, realign until it shines steadily. - 6
Re-test balance and function
Manually lift the door again to confirm it remains balanced after adjustments. Run the opener to verify proper operation.
Tip: If issues persist, stop and consult a pro rather than proceeding with risky fixes.
Got Questions?
Can I repair a broken torsion spring myself?
No. Torsion springs are under high tension and can cause serious injury. Replacing or adjusting them should be done only by trained professionals with proper safety equipment and tools.
Torsion springs are dangerous to handle without training; it's best to hire a professional for spring work.
What should I do first if my door won’t open?
Disconnect the opener and manually check balance. If the door is heavy or won’t stay in place, springs or balance components may need expert adjustment. Then test the safety sensors and limit switches.
First, disconnect power and test balance. If it’s hard to lift, call a pro for spring and balance checks.
How long does a typical garage door repair take in Columbus?
Non-spring issues usually take 1–2 hours if parts are readily available. More extensive repairs, or parts like springs, may extend service time and require scheduling with a technician.
Most simple fixes fit into a single visit; more complex spring work may take longer.
Is lubrication necessary and what type should I use?
Lubricate rollers, hinges, and track joints with a silicone-based spray. Avoid oil-based lubricants on metal tracks to prevent attracting dust and causing buildup.
Lubricate metal parts with silicone spray, not oil.
Do I need a permit for garage door repairs?
Most minor repairs don’t require a permit, but structural changes or new openers may. Check local Columbus codes and the door manufacturer’s requirements.
Typically not for small repairs, but verify if structural work is involved.
Should I replace weatherstripping during repairs?
Yes, inspect weatherstripping and replace if worn or cracked to improve energy efficiency and deter drafts and debris.
Replace worn weatherstripping to save energy and keep debris out.
What’s the difference between a DIY fix and a professional repair?
DIY fixes cover maintenance and minor adjustments but leave springs, cables, and structural components to pros. A pro ensures safe operation and correct spring balance.
DIY is fine for basic upkeep; save risky parts like springs for a pro.
Watch Video
Quick Summary
- Test balance before any opener adjustments
- Keep springs and high-tension components out of DIY scope
- Lubricate and tighten non-spring parts regularly
- Sensor alignment matters for safe closing
- Call a pro for major repairs or uncertain fixes