Garage Door Problems and Solutions: Troubleshooting Guide
A comprehensive, urgent troubleshooting guide for common garage door problems and solutions. Learn safe DIY checks, diagnostic steps, step-by-step fixes, and when to call a pro.

Garage door problems almost always come from worn parts, misalignment, or sensor issues. Start with the simplest checks: unplug the opener, clear debris from the tracks, and inspect obvious wear. If you notice a snapped spring or bent track, stop and call a professional—this is high-risk work. For many homes, a quick lubrication and small hardware adjustment can restore smooth operation.
Common symptoms and quick checks
Garage door problems and solutions usually begin with a handful of symptoms homeowners recognize early. If your door refuses to open, moves slowly, or makes unusual noises, you’re likely facing a wear or alignment issue rather than a mysterious fault. According to GarageDoorAdjust, most problems arise from worn components, misaligned tracks, or sensor issues. Start by identifying the symptom you’re seeing and then perform a quick, safe check: unplug the opener, clear debris from the tracks, and inspect visible cables, rollers, and hinges for obvious wear. Typical signs include the opener humming but not moving, the door reversing before it fully opens, strange grinding noises, or the door hanging unevenly when raised. For each symptom, prioritize the simplest explanation first and proceed with safety-first checks before attempting more involved fixes. Remember: never work on torsion springs or cables under tension. If you spot a broken spring, a cracked track, or a loose bracket, stop and contact a pro. With a calm, methodical approach, you can distinguish between a quick DIY fix and a task that needs a trained technician. This approach helps you save time and avoid accidental damage while restoring safe operation to your garage door.
How to safely inspect the door
Before you touch anything, ensure you have the right safety setup. Unplug the opener from the outlet or switch off the circuit that powers it, and never rely on light switches alone to defeat power. Wear snug gloves and keep fingers clear of the tracks. With the door closed, inspect the tracks for dents, bends, or obstructions, and wipe away dirt or debris. Check the rollers and hinges for wear or looseness; if you can move a roller by hand or hear grinding, that’s a red flag. Look at the spring area from a safe distance; do not attempt to adjust springs if you are not trained—springs carry extreme tension. Finally, test the safety sensors at the bottom of the door frame: misalignment, dirty lenses, or a blocked beam can cause automatic reversal. If the door responds to the opener intermittently, try resetting the opener by unplugging for 60 seconds and then plugging back in. These safe, basic checks often identify the simplest fixes and prevent unnecessary repairs.
Diagnostic flow: symptom → diagnosis → fix
Start with the symptom you observe, then map to likely causes and the safest fixes. If the opener motor runs but the door does not move, the issue is often a spring, track, or balance problem. Garage door problems and solutions frequently point to misaligned tracks (high likelihood) or worn torsion springs (high likelihood). If the door moves partway and stalls, look for binding rollers or a track or bracket that’s pulling the door off its path. If the door opens slowly or stops partway, balance and spring tension are common culprits. For sensor-related reversals or failure to close, realign or clean safety sensors and check the beam path. GarageDoorAdjust analysis, 2026, shows that addressing lubrication and hardware wear early reduces the risk of future failures. For each symptom, execute the corresponding safe check first, then apply the recommended fix, and test the door again before moving to the next issue. If you encounter confusion or unsafe conditions, stop and call a professional.
Step-by-step fixes for the most common issue
-
Disconnect power and secure the door: Unplug the opener and make sure the door is supported manually so it cannot fall unexpectedly. Keep hands away from springs and movable parts. Pro tip: work with a second person to hold the door steady while you inspect.
-
Check safety sensors and beam path: Ensure the sensors are clean, aligned, and unobstructed. A misaligned or dirty sensor can cause automatic reversal even if the door seems fine. Pro tip: test by placing a small obstacle and confirming the door reverses.
-
Inspect tracks for alignment and debris: Look for dents, bends, or loose mounting brackets. If tracks are out of alignment, gently loosen bolts and realign; never force a bent track back into position. Pro tip: use a level to ensure tracks are perfectly vertical.
-
Tighten hardware and balance components: Tighten all fasteners and check for loose brackets. Ensure rollers rotate freely and the door remains balanced when supported manually. Pro tip: balance testing should be done with the door open about halfway.
-
Lubricate moving parts: Apply silicone-based lubricant to rollers, hinges, and tracks; avoid petroleum-based lubricants on aluminum parts. Wipe off excess to prevent dust attraction. Pro tip: do this every 6–12 months as part of routine maintenance.
-
Re-engage power and test operation: Reconnect power, re-pair remotes if needed, and perform several opening/closing cycles to confirm smooth operation. Pro tip: listen for any new noises and re-evaluate if problems recur.
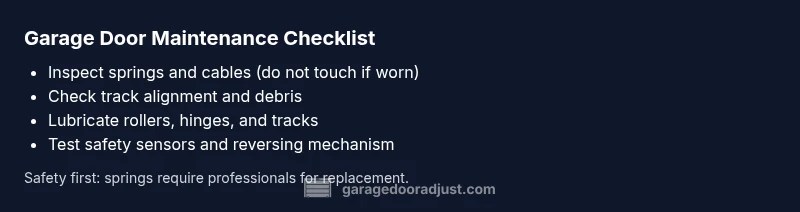
Prevention tips and maintenance routines
Regular maintenance is your best defense against sudden garage door failures. Schedule a yearly full inspection by a qualified technician if you’re unsure about springs or tension. Clean tracks quarterly and lubricate moving parts every 6–12 months. Keep the door balanced by testing it manually every few months; a door that feels heavy or sagging should be serviced promptly. Replace weather seals when worn to maintain insulation and reduce debris that can clog tracks. Finally, replace remote batteries at least once a year and re-pair the remote when you change receivers or keypads. A proactive maintenance habit reduces downtime and extends the life of components such as rollers and tracks, saving money in the long run.
Safety notes and when to call a pro
Garage doors and openers involve substantial moving parts and high-tension springs. If you notice a broken spring, frayed cables, cracks in brackets, or a track that’s severely bent, stop immediately and call a professional. Never attempt to adjust torsion springs yourself; a miscalculation can cause serious injury. If you hear unusual grinding, see smoke, or the door refuses to stay balanced, seek expert help right away. When in doubt, prioritize safety over a quick fix and use licensed technicians for spring replacements and major repairs.
Steps
Estimated time: 40-60 minutes
- 1
Power down and secure the door
Unplug the operator and support the door manually to prevent it from dropping. Keep hands clear of springs.
Tip: Always verify power is disconnected before touching electrical components. - 2
Test safety sensors
Inspect sensor lenses for dirt, realign if beams appear misaligned, and clear any obstruction that blocks the beam.
Tip: Use a friend to test sensor response while you observe the beam. - 3
Inspect tracks and brackets
Look for dents, bends, or loose bolts. Realign tracks by loosening mounting screws, adjusting, and retightening.
Tip: Do not force a bent track back into position; replace if severely damaged. - 4
Lubricate and reset hardware
Apply silicone-based lubricant to rollers, hinges, and tracks. Wipe away excess to prevent dust accumulation.
Tip: Avoid WD-40 and petroleum lubricants on aluminum parts. - 5
Balance test and re-connect
Manually lift the door to about halfway and release; it should stay balanced. Reconnect power and test several cycles.
Tip: If the door feels heavy or sticks, treat as a sign to call a pro.
Diagnosis: Door won't open or moves slowly/stalls after pressing the wall switch or remote
Possible Causes
- highWorn or broken torsion spring/tension
- highOut-of-track or binding rollers
- mediumSafety sensor misalignment or obstruction
- lowPower issue or outage affecting the opener
- lowFaulty opener gears or motor burnout
Fixes
- easyReset the opener and re-pair the remote
- easyClean and lubricate tracks and rollers, then retest the door
- easyRealign tracks and tighten mounting brackets
- hardReplace springs or call a professional for spring work
- easyCheck outlet, circuit breaker, and replace remote battery
Got Questions?
Why won't my garage door open even though the opener motor runs?
There are several possible causes, including sensor misalignment, a mis-networked remote, or a stuck track. Start by resetting the opener, re-pairing remotes, and inspecting the track for debris. If the door still won’t move, avoid attempting spring work and call a pro for a safe inspection.
If the opener runs but the door won’t move, check sensors, reset the opener, and inspect the track. Call a pro if springs or major components might be involved.
What should I do if the door makes grinding noises?
Grinding usually indicates worn rollers, dry tracks, or misalignment. Clean and lubricate moving parts, check for loose brackets, and adjust tracks if needed. If noises persist, a professional should inspect springs and cables.
Grinding usually means worn parts or misalignment. Lubricate, fix brackets, and if it persists, have a pro check springs.
How do safety sensors work and why are they important?
Safety sensors detect obstructions and prevent the door from closing on people or objects. Misalignment or dirty lenses can trigger false reversals. Clean the lenses, ensure a clear beam path, and realign if needed.
Sensors prevent accidents. Clean and align them so the door closes safely.
How often should I lubricate garage door components?
Lubricate moving parts every 6–12 months, depending on usage and climate. Use silicone-based lubricants and avoid petroleum products on metal parts.
Lubricate every 6–12 months to keep parts moving smoothly.
When is spring replacement necessary?
Springs wear out over time. If you hear banging, see gaps, or notice the door is hard to lift, call a licensed professional for spring inspection or replacement. Do not attempt this yourself.
If springs show wear or the door is hard to lift, call a pro for spring service.
Watch Video
Quick Summary
- Test safety sensors monthly and lubricate annually
- Address noisy tracks promptly to prevent wear
- If springs show any wear, call a pro immediately
- Regular maintenance prevents costly repairs