How to Reset a LiftMaster Garage Door Opener Remote
Learn how to reset a LiftMaster garage door opener remote and re-pair it with your opener. This guide covers model differences, battery checks, learning mode, and troubleshooting for reliable remote operation.

You will reset a LiftMaster garage door opener remote to re-synchronize it with the opener, clearing old codes and establishing a fresh connection. This quick fix often resolves mispairing after battery changes or interference. Before starting, ensure you have the remote, fresh batteries, and access to the garage door opener unit. Follow the steps carefully for a successful reconnect.
Why a reset can be the fastest fix for remote issues
A reset of the LiftMaster garage door opener remote is often the quickest way to resolve mispairing, lost codes, or interference after a battery swap or a power blip. When remotes stop opening the door or act sporadically, many homeowners find that a clean slate—clearing the opener memory and re-learning the remote—restores reliable operation. According to GarageDoorAdjust, model variations exist, but the core idea remains the same: refresh the handshake between the remote and the opener to restore dependable access. This section explains the why behind the process and what you’re aiming to accomplish with each step, so you’re not just performing a ritual but addressing the root cause: stale data or interference.
How the learning process works on LiftMaster remotes
LiftMaster remotes use a learning (or pairing) process that creates a secure code exchange between the handheld device and the garage door opener receiver. During learning, the opener temporarily accepts a new remote code and stores it in its memory. Over time, stored codes can become corrupted or conflict with newer remotes. A reset clears these codes, and a fresh pairing re-establishes a clean, reliable connection. This approach avoids replacing hardware and gives homeowners a cost-effective, DIY-friendly fix that is safe when performed with the unit powered per manufacturer guidance.
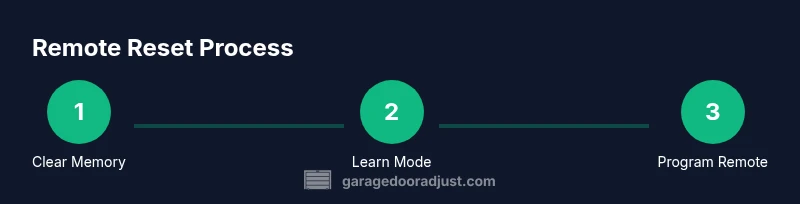
Distinguishing between a reset and a re-learning sequence
A reset typically clears the entire remote memory on the opener’s receiver, effectively erasing all paired remotes. Re-learning, on the other hand, is the act of pairing a single remote back into memory after a reset or after adding a new remote. In practice, you’ll usually perform a memory reset on the opener first, then run a fresh learning process for each remote you want to use. Understanding this distinction helps prevent missteps, like attempting to pair a remote without clearing old codes first, which can result in a failed pairing attempt.
Tools & Materials
- Replacement remote(s) compatible with LiftMaster(Ensure model matches your opener and that you have permission to pair remotes on the unit)
- Fresh batteries (e.g., CR2032 or the model-specific type)(Check the remote’s battery type and replace if needed)
- Ladder or step stool (optional)(Use if the Learn button is on a high-mounted motor unit)
- Small flathead screwdriver (optional)(Needed only if the opener has a recessed screw cover)
Steps
Estimated time: 15-25 minutes
- 1
Check model and battery
Identify your LiftMaster model number and inspect the remote battery. Replace with fresh batteries if there is any doubt about battery performance. A weak battery can mimic a pairing problem by reducing signal strength.
Tip: Keep a log of battery changes and model numbers for future reference. - 2
Clear existing remote codes from the opener
Locate the Learn/Program button on the garage door opener motor unit. Press and hold or press and release exactly as your model specifies to clear memory. This step removes all previously paired remotes.
Tip: If your unit has an LED, note whether it blinks steadily or goes dark during this process; this helps confirm memory clearance. - 3
Re-enter learning mode on the opener
After memory is cleared, reacquire learning mode by pressing the Learn button again or following model-specific instructions until the indicator light behaves as described in your manual. The opener is ready to accept a new remote.
Tip: Do not hold Learn for too long on models that don’t require a prolonged press; follow the LED behavior indicated in your manual. - 4
Program the first remote
While the opener is in learning mode, press and hold the desired button on the remote for 3-5 seconds, then release. The opener should respond by blinking the light or ignoring a moment, indicating the remote has been learned.
Tip: Program only one button per remote to avoid confusion if you plan to use multiple remotes. - 5
Test the remote from inside the garage
Test the newly learned remote by pressing the programmed button to open and close the door. If it fails, check the battery again and try reactivating learning mode.
Tip: Test from multiple angles and distances (20–30 feet) to verify reliable range. - 6
Program additional remotes
Repeat Step 4 for each additional remote you want to use with the opener. Clearing memory means you must re-learn every remote you intend to operate the door.
Tip: Label remotes to avoid future confusion (e.g., 'Front Gate', 'Bedroom Shed'). - 7
Finalize testing and safety check
After all remotes are learned, perform a final test from inside and outside the garage. Ensure hold-to-stop features work if your system supports it, and confirm safety sensors reset as needed.
Tip: Keep children and pets clear of the door’s path during testing.
Got Questions?
Will resetting erase all remotes from the opener?
Yes. If you clear memory, all previously paired remotes will need to be reprogrammed after the reset.
Yes. Clearing memory removes all paired remotes, so you’ll have to reprogram them afterward.
How do I know my LiftMaster model uses Learn mode?
Most LiftMaster models use a Learn button on the opener. Check your manual for LED behavior and timing to confirm learning mode.
Most LiftMaster models use a Learn button on the unit; watch the LED to confirm learning mode.
What should I do if the remote still won’t pair after a reset?
Double-check battery, ensure you’re inLearn mode, and repeat the pairing sequence close to the opener. If it still fails, the remote may be defective.
If it still won’t pair, recheck the battery, confirm learning mode, and try again. If it fails, the remote may be defective.
Can I reset a LiftMaster remote using a smartphone app?
Some LiftMaster models support app-based pairing. Follow the app prompts for your specific model to re-pair remotes.
Some models let you pair remotes via an app; follow the app’s prompts for your model.
Is it safer to replace remotes rather than reset?
Resetting is usually sufficient to restore functionality. Replace remotes only if multiple attempts fail or remotes are damaged.
Resetting works in most cases; replace remotes only if several attempts fail or they’re physically damaged.
What safety precautions should I follow during reset?
Keep hands clear of the door, ensure no one is near the path, and avoid altering safety sensor wiring.
Stay clear of the door path and don’t tamper with safety sensors during the process.
Watch Video
Quick Summary
- Reset memory to clear old codes.
- Re-pair remotes one at a time for reliability.
- Test range from multiple positions to confirm performance.
- Keep fresh batteries on hand for consistent results.