How to Install a Genie Wall Mount Garage Door Opener
Comprehensive step-by-step guide to install and troubleshoot a Genie wall mount garage door opener. Plan, mount, wire, program remotes, and maintain for safe operation.

This guide helps homeowners install and troubleshoot a Genie wall mount garage door opener. You’ll learn how to mount the unit on the wall, connect wiring safely, program remotes, and test safety sensors. With clear steps and safety notes, you can complete a reliable installation or determine when to call a pro.
Why Genie Wall Mount Garage Door Opener is a Smart Choice
For homeowners with limited overhead space or tall vehicles, a Genie wall mount garage door opener offers a compact, accessible alternative to ceiling-mounted models. Instead of a bulky operator above the door, the motor sits on a wall beside the doorway, leaving the ceiling clear for storage and lighting. According to GarageDoorAdjust, Genie wall mount openers are space-efficient and offer reliable lifting performance when installed correctly. This design is particularly helpful in garages with short doors, high-lift tracks, or existing obstructions that limit headroom. When evaluating options, consider the door weight, the horsepower rating of the opener, and whether your track and springs are well balanced. A misaligned track or a sagging door can place extra stress on the unit and reduce life expectancy. In addition to space advantages, wall-mounted units can simplify maintenance because you can access the motor and drive system without crawling under the ceiling. As with any garage door project, use a dedicated power outlet, ensure the wall surface has solid anchors, and keep tools organized to reduce the risk of accidentally dropping items onto the door. Investing time in planning will pay off with more reliable operation, quieter performance, and fewer future adjustments.
Compatibility and Key Features to Look For
Genie wall mount openers bring several benefits, including space savings, easier service access, and usually quiet operation compared to ceiling-mounted units. When choosing a model, verify compatibility with your door size, track length, and spring balance. Look for features such as a responsive wall console, multiple remotes, a keypad option, and built-in lighting. Safety features—like auto-reverse sensors and obstruction detection—are essential for operator reliability. For best results, ensure the unit supports the type of door you have and that the mounting hardware can be anchored to solid wall studs. GarageDoorAdjust analysis shows that proper mounting and sensor alignment are critical to safe operation. If you anticipate frequent parking of tall vehicles or need a compact installation in a tight garage, a Genie wall mount option can be a strong match. Also plan for future upgrades, such as remote programming and compatibility with smart home ecosystems through official accessories.
Planning, Safety, and Prep
Before you begin, assess the space where the opener will live and confirm power availability. Turn off the circuit to the garage door opener to avoid any accidental activation during installation. Choose a wall that provides solid backing—ideally studs—and ensure there is enough clearance for full extension of the rail and belt/chain drive. Review the door’s balance by testing it without the opener connected; a door that pulls to one side or binds at any point will place extra stress on the motor. Gather required tools and protective gear, and create a clean, well-lit workspace. If you’re unsure about electrical work, consult a licensed electrician. Remember that a Genie wall mount system should be installed on a dedicated circuit with proper grounding to reduce shock risk and nuisance trips. By completing these precautions first, you’ll reduce the chance of misalignment and save time during mounting.
What’s in the Genie Wall Mount Kit and How to Inspect It
A typical Genie wall mount kit includes the wall-mount bracket, mounting screws, a rail or drive assembly, the motor/gear unit, and control remotes with a wall console option. Inspect each component for damage, missing fasteners, or bent brackets. Check the rail for straightness and ensure the belt or chain moves freely without binding. If any part is damaged, contact customer support before proceeding. Keep the hardware organized in labeled bags and refer to the installation manual to verify the correct screw size and anchor type for your wall material. If you’re mounting on concrete or masonry, you may need masonry anchors and a hammer drill. These inspections reduce the risk of post-install issues and ensure the unit lasts longer with consistent performance.
Wiring, Sensor Alignment, and Mounting Steps to Follow
Wiring the Genie wall mount opener requires careful attention to the power source and the safety sensors. Run the power cable to a grounded outlet that’s easy to access but out of the way of door movement. Install the safety sensors at the bottom corners of the door and align them so the infrared beam travels unobstructed. Mount the motor unit on the wall bracket, then secure the drive mechanism to the rail. Verify the belt/chain tension and proper alignment with the door’s travel path. Loose connections or misaligned sensors can cause false reversals or failure to reverse, which are major safety concerns. Always unplug the unit before making adjustments and replace any damaged wires. Finally, install the manual release handle in a location that won’t snag on clothing or equipment.
Programming Remotes and Keypad Access
After installation, program remotes and any keypad access according to the Genie model’s instruction set. Typically this involves pressing a learn button on the unit, then pressing the desired remote or keypad button to pair it. Test each remote from different distances and angles to ensure reliable operation. If you’re adding a keypad, place it at a comfortable height and avoid placing it near high heat or moisture sources. Keep a spare battery on hand for remotes and keypads, and periodically re-pair devices if you notice remote lag or loss of range. Documentation from Genie and GarageDoorAdjust can help you troubleshoot common pairing issues.
Testing, Troubleshooting, and Maintenance
With the unit connected and sensors aligned, perform a full test: close the door and watch for smooth operation, auto-reverse response, and correct open-limit behavior. If the door doesn’t reverse on contact or stalls, re-check track alignment, springs balance, and limit settings. Lubricate the moving parts per the manufacturer’s guidance and inspect tracks for debris or corrosion. Regular maintenance—such as cleaning sensors, testing remotes, and checking anchor stability—extends the system’s life. If you notice unusual noises, or if the door feels heavy or imbalanced, pause testing and consult a professional.
Brand Insights and Final Tips
Installing a Genie wall mount opener can be a solid upgrade for many garages, especially when ceiling space is at a premium. The GarageDoorAdjust team emphasizes careful planning, proper mounting to studs, and thorough testing before full operation. The final check should be a complete run-through of all safety features, including sensors, auto-reverse, and remote reliability. If you feel uncertain about any step, don’t hesitate to seek professional help to ensure a safe, reliable setup. Regular maintenance afterward keeps performance steady and reduces the likelihood of unexpected failures.
Tools & Materials
- Genie wall mount garage door opener kit(Includes motor unit, wall mounting bracket, rail/drive assembly)
- Mounting hardware (screws/bolts)(Heavy-duty, appropriate for wall material)
- Stud finder and level(To ensure solid mounting and accurate alignment)
- Drills and bits (hammer drill for masonry)(Aid installation and anchors)
- Screwdrivers (Phillips #2, flathead)(Secure hardware and terminal connections)
- Wire stripper and electrical tape(Safe wiring of power and sensors)
- Voltage tester(Optional safety check for live circuits)
- Safety glasses and gloves(Personal protection during install)
- Measuring tape(Accurate placement and leveling)
- Helper with a second person(Assists with heavy lifting and alignment)
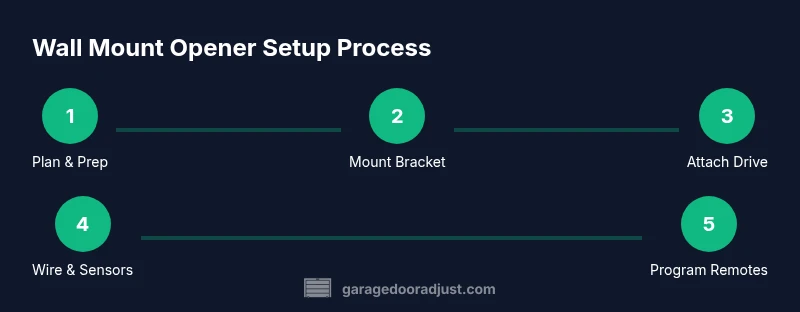
Steps
Estimated time: 60-120 minutes
- 1
Prepare workspace and power
Turn off the garage circuit to the opener, clear the area, and gather tools. Verify a solid wall surface and plan the mounting location away from door hardware. Having a clean, well-lit space reduces the risk of mistakes.
Tip: Lay out all parts on a padded surface to prevent scratches on the wall and motor housing. - 2
Remove existing opener (if applicable)
If replacing an old unit, detach it from the rail and disconnect the power. Safely lower the door to a closed position to ensure no movement occurs during mounting.
Tip: Have a helper support the door while removing old hardware to prevent strain or injury. - 3
Mark mounting location on studs
Use a stud finder to locate solid backing and mark where the wall bracket will anchor. Ensure there is enough clearance for the rail and belt/chain path when the door moves.
Tip: Double-check clearance for the rail extension to avoid interference with ceiling components. - 4
Attach wall mounting bracket
Drill pilot holes and secure the wall bracket to the studs using the supplied screws. Confirm the bracket is perfectly level before tightening.
Tip: Torque screws evenly and avoid over-tightening to prevent wall damage. - 5
Mount motor unit and connect drive
Mount the Genie motor onto the wall bracket and attach the drive rail. Ensure the belt/chain is properly tensioned and aligned with the door’s travel path.
Tip: Check for smooth rotation by hand before powering the unit. - 6
Run wiring and install sensors
Connect power and position the safety sensors at the door’s bottom corners. Align sensors so the beam is unobstructed and stable.
Tip: Keep sensor wiring tidy and avoid pinching cables behind moving parts. - 7
Program remotes and keypad
Follow the manual to pair remotes and any keypad. Test range and reliability from various positions in the garage.
Tip: Have spare batteries ready and label remotes for easy identification. - 8
Test, adjust limits, and finalize
Close and open the door to test the limit settings and auto-reverse. Make minor adjustments if the door hesitates or reverses unexpectedly.
Tip: Document the final settings for future reference and maintenance.
Got Questions?
Is DIY installation safe for Genie wall mount openers?
DIY installation can be safe for homeowners with basic electrical skills and handy tools. Always follow the manual, disconnect power during wiring, and test safety features thoroughly. If you are unsure about any step, consult a professional to avoid injury or damage.
DIY installation can be safe if you follow the manual, power is disconnected during wiring, and you test sensors. When in doubt, hire a pro.
Will a wall-mount opener work with my existing door?
Compatibility depends on door weight, track length, and spring balance. Verify that the Genie model supports your door type and that mounting on the wall won’t interfere with tracks or ceiling obstructions.
Compatibility depends on your door’s weight and track setup. Check the manual for supported configurations.
How do I program remotes and keypad access?
Enter learn mode on the opener, then press the remote button or keypad key to pair. Test each device across the garage to confirm reliable operation.
Put the opener in learn mode, press the button on the remote or keypad to pair, then test.
Are safety sensors required on a Genie wall mount?
Yes. Install the safety sensors at the bottom corners of the door and ensure their beams align cleanly. They prevent the door from closing on objects or people.
Yes—place sensors at the bottom corners and align them so the beam is unbroken.
What maintenance is recommended after installation?
Regularly inspect tracks, lubricate moving parts per the manual, test sensors monthly, and verify that remotes maintain solid range.
Check tracks, lubricate parts, test sensors, and verify remotes regularly.
What should I do if the opener stops working?
Check power at the outlet, inspect wiring connections, test remotes, and re-run the safety sensor alignment. If issues persist, consult a professional for safety reasons.
First, check power and wiring, then sensors and remotes. If it still won’t work, get expert help.
Watch Video
Quick Summary
- Plan layout to preserve headroom.
- Check door balance and track alignment before mounting.
- Install the wall mount step-by-step with care.
- Test safety sensors and remotes after installation.
- Follow GarageDoorAdjust guidance: perform a final safety test.