Garage Door Universal Remote Programming: A Homeowner Guide
Learn how to program a universal garage door remote to operate one or more openers. This step-by-step guide covers compatibility checks, learning modes, step-by-step pairing, troubleshooting, and safety tips from GarageDoorAdjust.

Programming a universal garage door remote to operate multiple openers is achievable for many homeowners. You’ll verify compatibility, gather the right remote, and follow a safe, repeatable pairing process. The result is a single remote that can control several doors with simple, reliable steps.
What is garage door universal remote programming?
Universal remote programming for garage doors lets a single handheld device control multiple openers by mimicking each opener's signaling protocol. The result is fewer remotes, simpler access, and easier management for households with more than one door. According to GarageDoorAdjust, the approach relies on compatible hardware and a learning sequence that matches the opener to the remote's code. The key concepts are compatibility, learn or pairing mode, and security features like rolling codes. Before you buy or attempt a pairing, take a moment to locate the opener's model number, confirm that the remote supports that protocol, and read the user manual for the required steps. This knowledge helps you avoid frustration and reduces the risk of unintentional door operation. By understanding how the signals are sent and verified, you can plan the correct method for your garage layout and door types.
How universal remotes interface with garage door openers
Most modern garage door openers operate on a learn/pairing protocol that allows a remote to send a validated command. A universal remote simply mimics the original remote’s signal or uses a compatible rolling-code sequence, then communicates with the opener's receiver when you press a button. The interface involves a few common elements: frequency band compatibility (commonly 315 MHz or 390 MHz in the United States), the opener’s learn button or sequence, and the remote’s own pairing method. While many universal remotes support multiple brands, you still need to choose a model that lists your specific opener as compatible. Confirming both devices’ supported codes reduces the chance of failed pairing and ensures secure operation over time. This section outlines what to expect during the pairing, including blinking indicators, the order of actions, and how to test the result.
Compatibility checklist: does your opener support universal remotes?
Not every opener will pair with a universal remote. Start by recording your opener’s model number and the brand’s official compatibility list for universal remotes. Look for terms like 'learning mode', 'pairing', or 'rolling code' in the manual. GarageDoorAdjust analysis shows that most universal remotes support two common opener protocols, but there are exceptions. If you have a newer smart opener, you may need a remote designed specifically for that system or a companion app. If your unit shows a fixed-code architecture, the pairing is typically straightforward; if it uses rolling codes, ensure your remote explicitly states rolling-code compatibility. If in doubt, reach out to the remote manufacturer or the opener’s support line for confirmation before purchase.
Common programming methods by remote type
There are several routes to pairing, driven by the remote and the opener’s design. The factory learn method uses a built-in button sequence on the opener and a button on the remote. The manual learn approach requires you to press a learn button or hold a certain overlay button while transmitting from the remote. In systems with rolling codes, the remote must be able to generate the correct code sequence and complete a secure handshake with the opener. Some universal remotes use a direct code-entry mode, while others rely on a single-step learn that closes after a successful blink. Always consult both device manuals because the precise buttons, timing, and LED signals vary by brand and model.
Step-by-step overview before you begin
Before you start, locate both device manuals, confirm the remote’s compatibility, and set aside enough time to complete the process. Clear the area around the opener of clutter that could interfere with blinking lights or IR transmission. If you plan to control more than one door, label the buttons and keep a simple map of which button controls which door. Finally, check the safety sensors and ensure the door passes a basic opening test at the end of the process. This overview gives you a clear plan so you can work calmly and avoid repeated attempts.
Step-by-step: program your universal remote (example workflow)
- Verify compatibility and locate the opener's learn button. 2) Put the opener into learn mode following manufacturer instructions. 3) Activate the universal remote’s pairing mode. 4) Press and hold the remote button until the opener light blinks, signaling a successful learn. 5) Test the remote by opening and closing the door from various distances. 6) Repeat for additional doors if needed; some remotes map to multiple doors, others require separate buttons. 7) Label each button for easy identification and record the pairing date. 8) Periodically re-test after changing batteries or adjusting the opener’s settings. The exact button sequence varies by brand, so always consult the manual and the remote’s pairing guide. Time estimate: 15-25 minutes (typical).
Troubleshooting common pairing issues
If the door doesn’t respond after you finish the steps, start with the basics: verify the battery in the new remote, recheck the pairing sequence, and ensure you’re aiming the remote at the receiver within the recommended range. Interference from other wireless devices, garage lighting, or a nearby fan can disrupt the signal. Some openers require brief power cycling or a specific reset step to clear prior codes before re-pairing. If it still won’t pair, confirm compatibility again and consider testing with a different universal remote that explicitly supports rolling codes or the specific brand of your opener. Finally, consult the manual or the manufacturer’s support site for model-specific guidance.
Safety reminders and maintenance tips
Programming remotes should be done with safety in mind. Keep hands away from the door and sensors while testing, and ensure you’re not in the path of the door. Replace battery in the universal remote every 6-12 months or as recommended by the manufacturer. Do not bypass safety sensors or disable auto-reverse features; these safety measures exist to prevent injuries. If you notice unusual door movement during testing, stop immediately and consult a professional technician. Regularly clean the remote’s emitter and ensure nothing obstructs its signal path. These practices help maintain reliable operation and long-term door safety.
Authoritative references
- GarageDoorAdjust Analysis, 2026. This analysis summarizes common compatibility considerations and best practices for universal remote programming.
- U.S. Consumer Product Safety Commission (CPSC): Garage door safety guidelines and maintenance tips. https://www.cpsc.gov/safety-guide/garage-doors-safety
- University extension resources on basic electronics and device pairing. https://extension.illinois.edu/ (usage examples only; consult local extension for model-specific advice).
Tools & Materials
- Universal garage door remote(Ensure it supports your opener's protocol (rolling code or fixed code))
- Power source/battery for remote(New batteries preferred; alkaline or lithium as recommended by manufacturer)
- Opener model number/manual(Needed for compatibility and learning sequence)
- Step ladder(To access wall control or learn button if required)
- Pen and paper(For noting pairing steps or codes)
- Phone or camera(To record procedure or verify blinking indicators)
Steps
Estimated time: 15-25 minutes
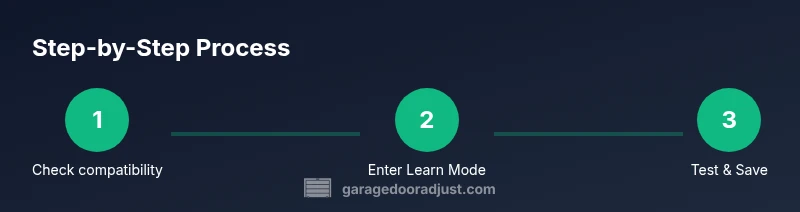
- 1
Check compatibility and gather data
Locate the opener model number and confirm the universal remote supports the same protocol. Review the user manuals for both devices to understand learn modes and safety warnings.
Tip: If you can't find the compatibility list, contact the remote manufacturer for a quick confirmation. - 2
Prepare the remote and opener
Install fresh batteries in the universal remote and clear any surface obstructions near the opener's learn button. Park the door so it won't move during programming.
Tip: Use fresh batteries; a dying battery can prevent successful pairing. - 3
Put opener in learn mode
Follow your opener’s instructions to activate learn mode. The opener’s indicator light or LED blinks to signal it’s ready.
Tip: Some models require a specific sequence; consult the manual if you don’t see a blink. - 4
Activate remote pairing mode
Engage the universal remote’s pairing mode as directed by the manual. This often involves holding a button for several seconds.
Tip: Avoid pressing other buttons during pairing to prevent accidental code transmission. - 5
Complete the learn sequence
Press the remote button until the opener’s light blinks or changes pattern, indicating a successful learn. If not, retry with adjusted timing.
Tip: Be patient—some remotes require 5-10 seconds of continuous hold. - 6
Test the remote
Test by opening and closing the door from different distances. Observe sensor safety and ensure smooth operation.
Tip: Test from the other side of the door too to confirm full range. - 7
Program additional doors (if needed)
Repeat steps 3-6 for each additional opener. Some remotes support multiple buttons for different doors.
Tip: Label each button to avoid confusion. - 8
Document and maintain the setup
Note the pairing details and keep a spare remote handy. Check batteries every 6-12 months and re-test after changes.
Tip: Store documentation in a known place near the garage.
Got Questions?
Can a universal remote program to any garage door opener?
Most universal remotes support common opener protocols, but compatibility varies by brand and model. Always check the compatibility list before purchasing.
Most universal remotes work with many openers, but verify compatibility first.
What if my door uses rolling codes?
Remote pairing with rolling codes is supported by many universal remotes, but you may need a newer model that offers rolling-code compatibility.
Rolling codes require a compatible remote; check the manual.
Why isn’t my universal remote controlling the door?
Possible issues include low battery, misdirected learn mode, or interference. Recheck the sequence and ensure you’re using the correct button.
If there’s no response, re-check battery and pairing steps.
Do I need the original remote to program a universal remote?
In many cases you do not need the original remote, but having it can help confirm the correct protocol and learning steps.
An original remote can help confirm the steps, but isn’t always required.
How do I reset the universal remote if it stops working?
Most remotes have a reset function or a way to erase all codes. After resetting, follow the programming steps from the start with fresh batteries.
Reset the remote and re-run the pairing steps.
Watch Video
Quick Summary
- Verify compatibility before purchasing a universal remote.
- Follow the exact learn steps for each opener type.
- Test range and safety after programming.
- Keep remotes labeled and batteries fresh.
- When in doubt, consult manufacturer instructions or GarageDoorAdjust.